Speyside Way Equipment
I am keeping a careful track of the equipment I am using on these lightweight walks, so afterwards I can assess what worked, what didn’t and what I did not need to carry next time.
My rucksack – it was called retro at the campsite last night, and that’s true it is. Using it on these walks is at the limits of its capabilities. It is not comfortable. I added the hip belt (about 25 years ago), it is not padded nor does it put this heavier load load onto my hips. So a new pack is – I really want a GoLite Jam – there was one in a shop in Aviemore but I think I can get one much cheaper online.
The cooking gear is very light and performs well – although if it is very windy it needs a bit more shelter than the wind shield provides.
The tent cost me less than £20 in the end of season sales last year – it performs well, gives lots of space and once I had changed the heavy steel pegs for titanium ones it is not overly heavy. But looking at Emily’s tent last night I can see the advantages of a specialist one man tent. The extra space I get in my tent is because it can sleep two – so I am now looking for a one man tent, that will save weight straight away. Her tent packed away very easily this morning – mine I have to fold exactly right to fit in my backpack. I also want a tent with a much better porch than on the Bedrock 2, in really bad weather it gives no space to use, even, my small meths stove let alone a backpackers gas stove! (I know it can be dangerous to use a stove in the tent, but we all do it – so just take extra care!)
The food was enough for me – but the weather was not cold, I think if it was colder I’d add more.
I did not use the monocular, didn’t use it last walk either so I will not bother to pack that again.
Other than the repair kit, FAK and other medicines, I used all the items in sundries bag.
Replace the steel pegs with Ti ones.
Did I miss anything – not that I can think of.
Update
Yes there were a couple of things that have now come to mind
I must put a couple of my business cards in the iPhone wallet.
Take 50ml less meths
Update – 23/8/2011
I have been using the mug/stove today on the beach near Dornoch – the windshield worked to allow me use the stove in a medium wind, however the stove consumed about twice the fuel for one mug of tea and two instant noodles as it does when used in a sheltered location. I will have to take that into account for “windy” trips.
I think I will look around for a lightweight pot lifter to use with my Ti mug when using it as a pot – the handles can get hot, and using the cloth bag protect my fingers can be difficult. It could also be used to lift the mug lid when it is hot.
Grantown on Spey to Aberlour 17-18 August 2011
Day 1 – 14.5 miles
Day 2 – 12.5 miles
Karrimor Hotlite 30l sack
2x 3l side pocket
Karrimor 1100 sleeping bag
Silk liner
Air mat in black plastic sack + 2x elastic and 2x mini bungees
3x dry sacks
Belt lens case for brewkit – ease of access on the trail
Coleman Bedrock 2 Tent
12 Ti pegs
4 steel
white bin liner – to pack the tent in if wet on the second day (it was)
Plastic sheet/sit mat 60cm x 30cm
Cooking
Ti stove inc copper mug support
2 fuel tablets -emergency fuel
100 ml meths
100 ml meths
50ml meths
Half aluminium wind shield
Stove board/stand
Ti mug and lid
Beaker with lid
Small brewkit in neoprene case – 4 teabags, 1 Indian tea, 15mls dried milk and 2x brown sugar
2x lighters
High absorbent cloth – drying up
Pot sponge
5ml washing up liquid
Small LMF spork
Folding spoon/knife
Wide mug
Cutting board – plastic 5cms x 12cms
Headlamp
iTorch – led wind up
FAK includes hotel sewing kit
Safety pins, gaffer tape, needle and thread, cable ties and paracord
Two clothes pegs
Light weight North Face jumper
Spare walking socks
Spare underwear
Hat, headover and gloves
Small wash kit and high absorbent cloth
Camper SAK
Leatherman P4 Squirt
whistle
LMF fire steel
Compass
2l Camelbak
75ml SIS bottle in belt case
1l Platypus roll up bottle
Nano iPod and headphones in neoprene case
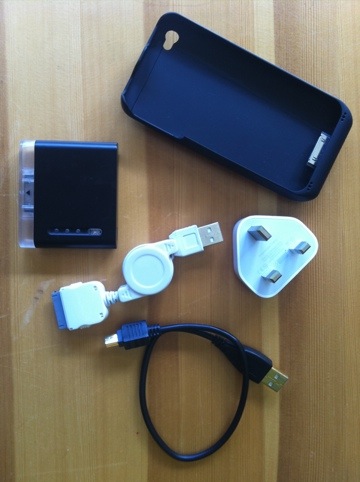
iPhone 4 with extended battery
Booster battery for iPod/iPhone
Aquapak
Monocular
Headphones for iPhone
Swisscard
Money £10
Pencil and notepaper
Personal medicine
Sunglasses
Cricket hat
Compeed stick
Lip balm
Sun stick – factor 50
Trail food for two days
Glucose tablets
1x spice oat cakes
Nutella and Italian crackers
Salted cashew nuts
Banana chips
2x 2in1 coffee for brew stop
Lunch
Can of tuna and sachets of BBQ sauce
Evening meal/Supper
Noodles
Tomato cup a soup
Salami
Instant custard
Tea and coffee
Italian crackers and jam
Hot chocolate
Breakfast
Instant Porridge with dried milk and jam
Cereal Bar
Tea and coffee
Lunch
Salami
Italian crackers
Indian tea with 100mls Rice Drink
SIS Rego – 50g
2x Boots orange energy tablets
SIS PSP Energy- 50g
1oz whiskey
Spare food
2x cereal bars
Wearing
Rohan vest
Lightweight long sleeved polartec shirt
3way Crag Hoppers
Northface Boots
Walking socks
Underwear
High Tech Notes
iPhone 4 – 32GB
Protected from the weather in an older version Aquapac – I was able to use the phone in the rain but unable to use the camera as the reverse of the case is not transparent.
I had two extra power options.
An extended power pack jacket which I kept fitted to the phone and a spare booster recharger which I did not need to use. If I need to use this booster I have to remove the power jacket first.
Things I used my iPhone for;
* Making and taking phone calls, texting and emails – built in apps
* Browsed the web – built in app
* Camera – both the built in camera app and Camera+, and reviewed the photos with the built in app
* Navigation – MemoryMap both 25k and 50k maps with the Speyside Way marked (I downloaded the gpx files from here http://www.walkhighlands.co.uk)
* Writing this blog – using the WordPress app, to which I wish they would add basic text formatting
* eBook reader – Stanza app
* I watched a movie – I have the no longer available VLC app
* Checked the weather – built in app
* Taking notes – built in Notes app
* Reviewed a quote one of our engineers sent me – Documents To Go (PDF, doc and xls files)
* Remoted into a server to discuss an issue with one of our engineers – Mocha RDP app
I used an iPod Nano, third generation, to listen to music, podcasts and a full screenplay version of Isaac Asimov’s Fantastic Voyage whilst walking. I keep it in a neoprene case, in an inside pocket of my Rohan Vest to protect it from the weather. It can be recharged using the same booster pack I use with the iPhone.
Speyside Way Equipment Read More »


.JPG "Pine Lake")
.JPG "Pine Lake")
.JPG "Pine lake")
.JPG "Pine Lake")
.JPG "Pine lake")
.JPG "Pine Lake")
.JPG "Pine Lake")
.JPG "Pine Lake")
.JPG "Pine Lake")
.JPG "Pine Lake")
.JPG "Pine Lake")
.JPG "Pine Lake")
.JPG "Pine Lake")
.JPG "Pine Lake")
.JPG "Pine lake")
.JPG "Pine Lake")
.JPG "Pine Lake")
.JPG "Pine Lake")
.JPG "Pine Lake")