Crusader Cook Set

REI Sierra cup and lid

I recently got an REI Sierra cup with a folding handle from the USA. It is a great, compact cup to take camping, but I was interested in getting a lid for it to add to the functionality and to keep the flies out of my tea.

I have had two lids made for me, one for my MSR titanium mug and the other for my Crusader mug.

I may get a custom lid made later, but for now I was looking for a purchased option.

The Sierra cup lid, because of the folding handle, needed to be an internal lid with no lip, or have a notch cut out of the lip for the handle. So what I needed was really just a metal disk with a hole for a handle drilled in it. On searching online I realised that the base from a cake tin with a removable base would be ideal, although I could not find one small enough in a UK shop. With that as a plan, I decided to visit some of the local kitchenware shops and in the second one, I went to, I found exactly what I needed.

cake tin from the Range to make REI Sierra cup lid

This is the removable base from a 12cm cake tin, from The Range, with a hole for a wing nut and bolt.

REI Sierra Cup with a homemade lid

REI Sierra Cup with a homemade lid

The lid sits neatly inside the cup rim as though it was made for it. Having a lid will make it more fuel efficient if I use the Sierra cup to boil water in. I am forward to testing it this weekend on a day walk on Sunday – I will boil the water for my tea break in it.

One small point: I had to use a file to smooth out a few sharp edges on the handle ends where the metal had been flattened to stop it pulling out. 

This is not ultra lightweight backpacking kit but it is something I will be taking camping.

REI Sierra cup and lid Read More »

Camp Coffee

How do I make camp coffee?

Camp coffee – I was asked last night, had I got a recommendation for a “camping gadget” for making fresh camp coffee when hiking or camping? I do have one, but my answer was unexpected. My friend was expecting me to recommend something from GSI or some other ultralight gear manufacturer. Instead I suggested a plastic tea strainer.

Here are some recent posts about camping coffee:

Making camp coffee in my Crusader Mug

Here is a photo from a trip to Wales – fresh camp coffee whilst camping on the Welsh coast. I am dripping the coffee into some milk that I have already heated in my steel British Army Crusader mug.

The coffee filter

I use the tea strainer as a coffee filter. It is not as fine as commercial filters but it does a good job – but there will be a few grounds in the final brew.

It is very lightweight, simple to use and pack. It is also far cheaper than the commercial camp/backpacking coffee makers.

I chose a strainer with a plastic mesh because it is easier to pack, as it can be crushed, and it has a finer mesh than the metal models.

How I make camp coffee

I make my camp coffee in two ways:

Make in the pot method

I measure the grounds into cold water and then bring the mixture to almost the boil, stirring occasionally. I leave the coffee to stand for three or four minutes before gently pouring it into a mug through the strainer. I am careful not to stir up the grounds once they have settled. With this method I can make more than one serving of coffee and can make a stronger brew if I want.

Drip method

I pack the coffee into the strainer to cover the mesh and press it down firmly with the back of a spoon. I drip/slowly pour through, nearly boiling water. The strainer holds enough grounds to make one mug of coffee.

This method makes less washing up so is my favourite when wild camping.

Making camp coffee in my MSR titanium mug on the summit of The Old Man of Coniston
Early morning coffee on the summit of The Old Man of Coniston – read the full story here.

My “coffee maker” is an essential part of my backpacking and camping cooking gear and I use it on most trips. I bought mine a few years ago and it cost 20p at the time. Asda and The Range sell suitable tea strainers, today, at about 50p. I’d recommend anyone to try one out before spending more money on a coffee gadget.

There are other coffee makers on the market!

Jeremy and I saw this portable coffee maker when we were in Truro last year. Click this link to read the blog post.


Fresh Coffee Update

To make packing easier I have cut the handle down on the tea strainer – see the story here.

Fresh coffe - summer 2016
Breakfast in bed – Scotland August 2016

Camp Coffee Read More »

Sea to Summit gear update and woodland walk

After the showers stopped I got out for a short walk through some local woods.

My coffee stop was noisier than normal – I had sat down on the field edge to make my coffee. A few minutes later a WI walking group of about twenty stopped along the path on the other side of the hedge. When they walked past they did comment that they must have made more noise than I did!

Sea to Summit Travel Day Pack

This bag has become my “go to” day pack, virtually since I got it. I like he simple design and with the addition of a dry sack or two it is very practical. It is large enough to hold a day load and although the shoulder straps have no padding, it has proved comfortable to carry (remembering that the weight if the load is limited by the small size).

Sea to Summit make a larger model, to which they have added an external compression/extra gear carrying system. Having somewhere to put a wet rain jacket or sling a layer when not in use is the one thing my Sea to Summit Travel Day Pack lacks. I have been thinking of adding some solution myself and this week I realised how I could make a mod that would not really add anything to the weight.

Finding the right material for the loops would be important. There is a top loop in the bag already and I was looking for some similar tape.


here is the loop between the shoulder straps sewn into the seam – I did not think I could copy this

Sea to Summit backpack
here is my Sea to Summit backpack showing the loops with a spare guy line and cord lock

One problem I thought about was where on the bag would be strong enough for any loops to be attached to? I had thought several times about opening the seams and trying to fit a loop in there but I considered that that would weaken the bag too much.

Here is my modification:

  • I made the loops from the guy lines I removed from my MSR Hubba tent as it was strong light cord that I could sew.
  • Having made the loops I hand stitched them onto the pack over the seams – as these were the strongest points which would take the strain when the cord was pulled tight holding something to the bag.

Here are three shots showing the different anchor points:

I have fitted a spare guy line through the loops, today, as I thought it might come in useful as spare cord, but I will replace it with some elastic cord as that will hold onto the gear, slung on the bag, much better.

More wear and tear

I have previously written about the wear and tear on the Sea to Summit backpack due to the regular use I make of it – see here. Whilst sewing these loops on I noticed some more substantial damage to the bottom of the bag. Being on the bottom, where if it fails I might loose some equipment I needed to make some repairs. I decided that a patch of Tenacious Tape would be a good fix – stuck on the inside of the bag over the heavy abrasion.

I made sure that I kept the thin nylon as flat as possible whilst I put the tape on. Watch this space to see how this works out. If (when) the bag fails I will not hesitate to buy another to replace it.

Today’s load

  • 2l dray sack – small first aid kit, sun hat, brew kit etc.
  • rain jacket
  • sit mat and cut down tarp
  • complete Crusader cook set including water in the 58 Pattern bottle

see the finished bag here

Sea to Summit gear update and woodland walk Read More »

Some thoughts on my outdoor gear

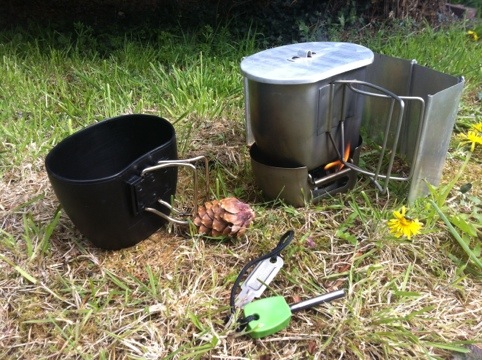
Outdoor Gear Army Style Crusader Mug

For my walk today I packed my Crusader Mug and Vargo meths stove outdoor gear rather than carrying my backpacking cookset which I usually take. I took the Crusader mug with me camping last week, which reminded me how useful it is as a pot/mug.

Outdoor Gear - Crusader Mug

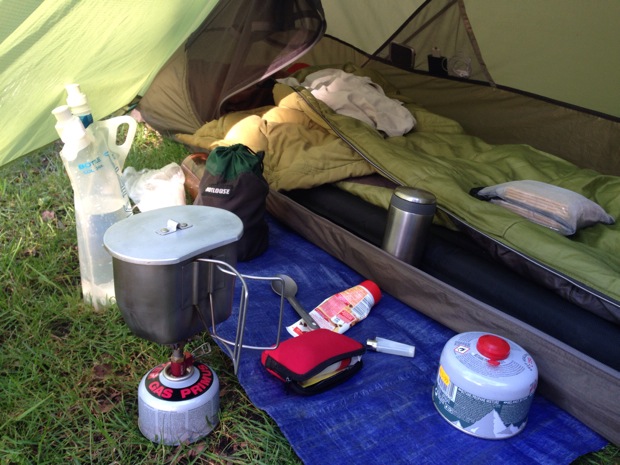
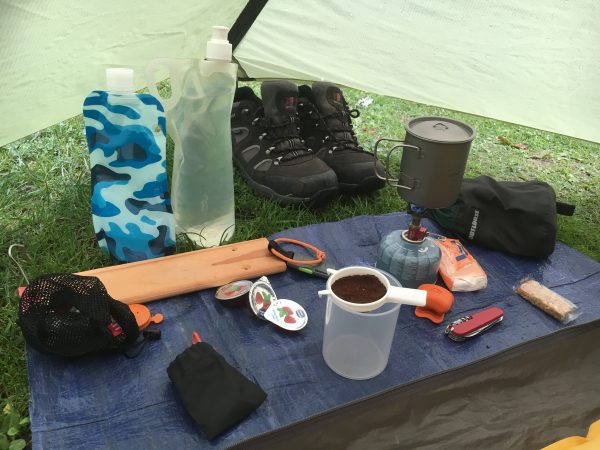
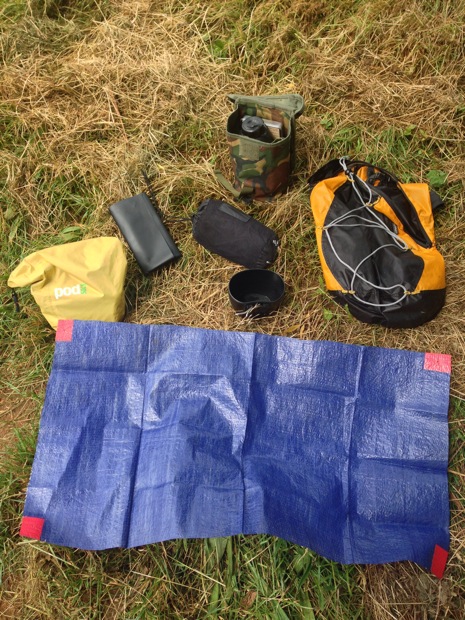
Above – some of my outdoor gear, the Crusader mug and lid, the Footloose bag that holds my compact cooking kit and the red brew kit pouch (see below)

The Crusader mug is outdoor gear made for the Army – it is well made, tough and practical.

When I use the titanium Alpkit MiTiMug for cooking it seems no matter how much I stir the food there is always some of it burnt on the bottom of the pot. It is the thin titanium that allows the food to heat and burn too quickly. Last week when I was cooking in the Crusader mug, with regular stirring it was easier the keep food from burning. The thicker steel of the military mug reduces the problem. The steel gives a better heat distribution so making cooking easier. I have fried bacon, sausages and made scrambled eggs in the steel mug something that I would not do in the titanium one.

When camping this year I am going to use the Crusader mug more. However the one issue with Crusader, when compared to the MiTiMug is the weight. When backpacking the ultra light titanium mug/pot wins every time.

Tea

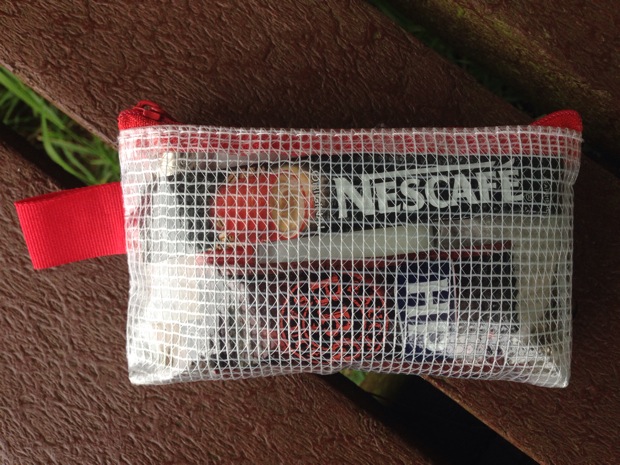
I have found that a small pouch that holds the basics of a brew kit, (tea bags and dried milk as a minimum) is a useful bit of outdoor gear to keep at hand. Going on any trip, camping, backpacking or even a business trip or hotel holiday, carrying these supplies has proved useful.

The first kit I can remember was a small draw string pouch that I had made and the dried milk was kept in a recycled brown plastic medicine bottle. (I am not sure we used the term recycled then!) Over the years I have used various bottles and different pouches but the brew kit has been a constant piece of equipment – and here is the latest version: Click here.

I have changed it again.

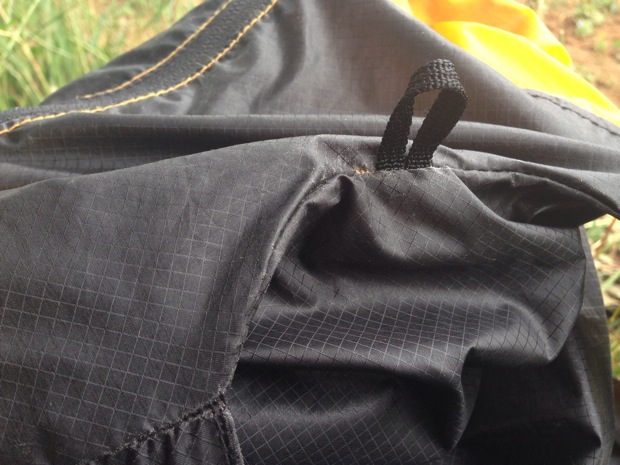
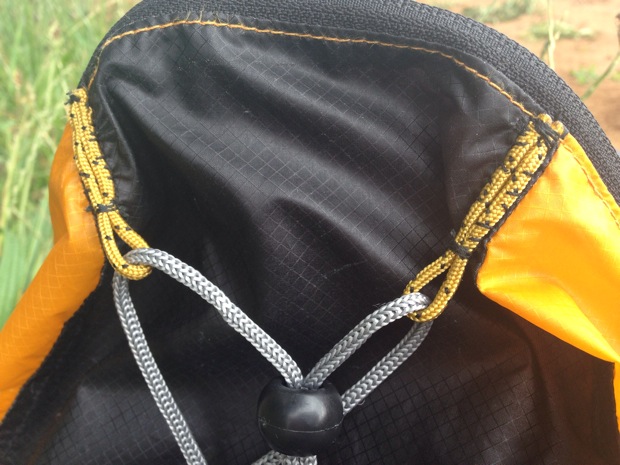
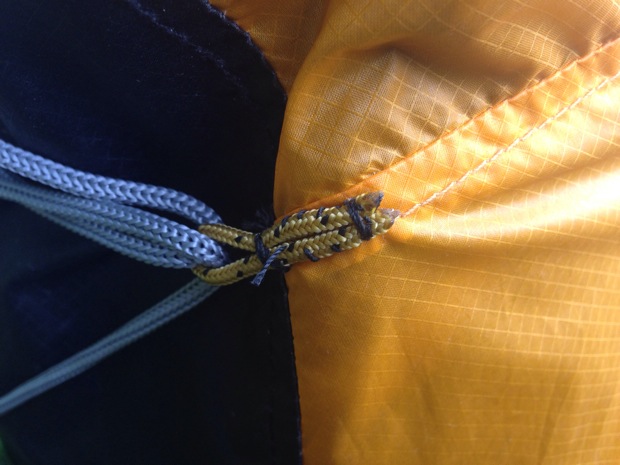
When I was packing away last weekend I accidently spilt some water onto the pouch – which soaked it up like a sponge and proved very difficult to dry out. Because of this I have changed to a plastic pouch that I hope will provide better protection. This is still pocket sized but it is slightly larger than the previous one, so I have added a sauce sachet and some extra coffee.

Power Pack

I am a heavy user of my iPhone. When outdoors I use it for map reading/GPS, writing this blog, taking and editing photographs, reading ebooks etc etc etc. This means keeping it charged is an issue. When I have my car with me I can plug it into the cigarette lighter socket or use the power inverter and the mains charger but when I do not have the car, I need another plan.

In my outdoor gear I have an emergency 2Ah battery pack (in my possibles pouch) and a 10Ah Battery Pack. I often use the 10Ah pack when camping with my car to charge my gadgets in the tent overnight. It does not weigh so much that I will not carry it on some overnight backpacking trips – I carried it on my last walk to Woodhall Spa so I had enough power to watch video during the evening.

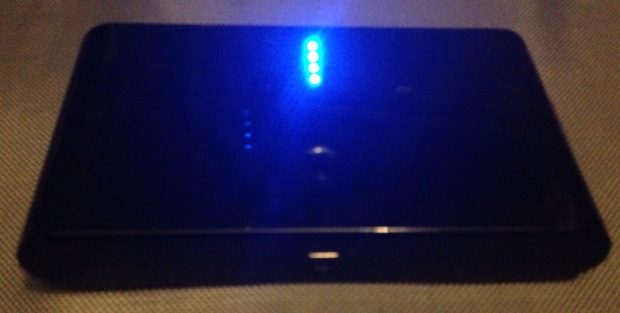
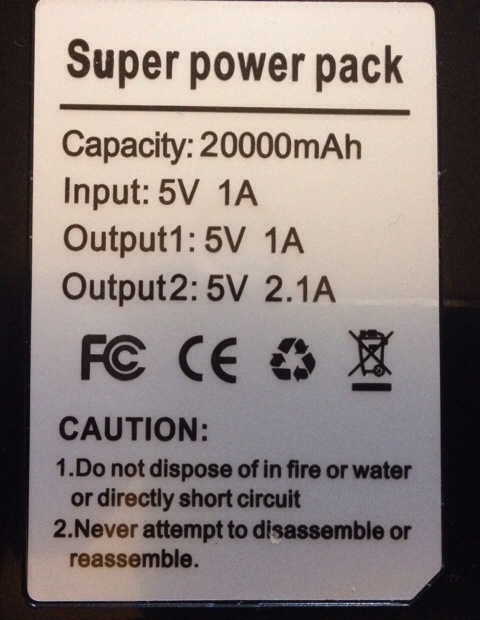
Before going to Sandringham last week I plugged the charger in, the lights flashed “oddly” and jammed on. It had obviously failed in some way, so I was no longer willing to plug my gadgets into this power pack. After a quick look on eBay I found a 20Ah unit for less money than I had paid for the 10Ah pack – so I bought it.

The new unit has several advantages over the last one:

  • Obviously it has twice the power storage!
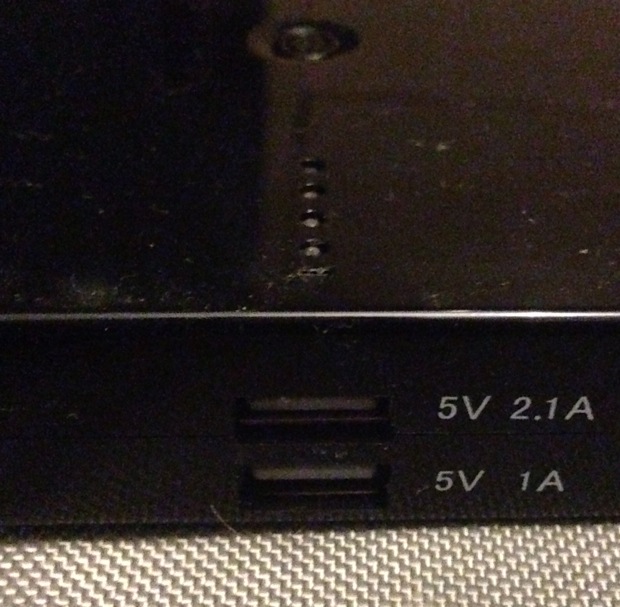
  • It has two USB ports, 5v at 1A and 5v at 2.1A.
  • Two devices can be charged at once.
  • My iPad can be charged from the 2.1A socket.

This power pack fits in the same case as the old one, although the 20Ah pack is a little larger and weighs 322g compared with 254g. The protective case weighs 101g so if I need to save some weight I can carry the it in a ziplock bag.


MP3 Player

To help preserve the battery life on my phone I have used an 8GB Apple iPod Nano, as part of my outdoor gear, for entertainment whilst walking and camping. Diana bought it for me whilst I was practice walking for the Wainwright’s Coast to Coast Walk in 2007 but by the spring of 2014 the battery had faded.

HTC Wildfire S

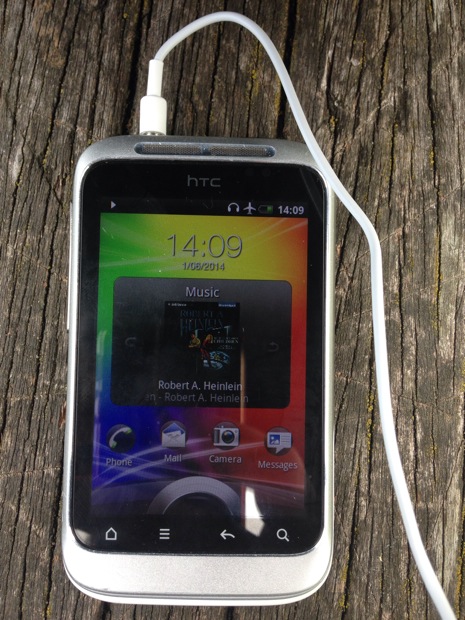
Outdoor gear MP3 player – listening to Robert Heinlein

We bought Jeremy an iPhone a couple of weeks ago and so he no longer needed his old phone – so I thought I would see if I could make a useable MP3 player from it.

The Wildfire S is very limited in internal memory, 256MB, but I installed a 16GB memory card for extra storage. On my first build I managed to fill the memory having added only a couple of apps as some of the installed apps could not be moved to the card.

A search of the internet gave me a patch for the firmware to allow me to move (nearly) all the apps I wanted to the card – it did not work for DropBox. I factory reset the phone and started again.

The first step was to disable the Mobile Network and then set the phone into Airplane Mode.  By turning on the wifi (whilst in Aiplane Mode) I could get online and install the apps I wanted. As part of this initial process I upgraded to Google Play, but did not upgrade any of the pre-installed apps.

I copied some music and audiobooks to the storage card and tried it out and the HTC Wildfire S makes a good MP3 player – with extras. It has wifi so I can get onto the internet.

I have installed:

  • Aldiko for ebooks
  • AntennaPod for podcasts
  • Google Drive and OneDrive (but not DropBox) to get access to books, audio books and music I store online
  • Memory Map and the full UK OS 50k map set
  • WordPress app
  • Twitter

These were the must have apps. I also added Google’s QuickOffice so I could at least look at Word or Excel files – I am not sure the screen is large enough or sensitive enough to do any major work on.

The Wildfire S also has a built in FM radio.

Jeremy had taken care of the phone so both the screen and battery were in good condition. I have added a screen protector – I cut down one I had in my desk for a previous PDA. I have replaced the 1.2Ah battery with a 2.5Ah model from eBay, keeping the smaller battery as a spare.

Overall this old phone will make a good replacement for my iPod and it gives me much more functionality. Using it as an ebook reader will have a great impact on my iPhone battery life, as I read a lot and have had to accept that battery usage, now I will save that. The battery life on the Wildfire is very reasonable when not using it as a phone or on wifi – if I carry a charge cable I can recharge the Wildfire from the Power Pack.

Some thoughts on my outdoor gear Read More »

Veryan Campsite pt4

20121031-092828.jpg

Morning coffee before Jeremy gets up -boiled up in my Crusader Cookset but using my Vargo Ti meths burner as it is cleaner than solid fuel tablets. Even though we have an MSR Pocket Rocket gas stove with us the meths burner still gets a lot of use, especially when we need to boil water for both of us – and we are not in a hurry. It also is a good second burner when cooking – again best for boiling water. The down side is it takes a bit longer to boil the water compared to the MSR stove.

Veryan Campsite pt4 Read More »

Compression Sack

I have got a better quality compression sack to hold both my sleeping bag and spare clothes.

I looked at several different models of compression sack but opted for this Lifeventure model as it was the lightest, but with a design that distributed the compression evenly. My Eurohike sleeping bag came with a lightweight compression bag but it only used straps rather than a cap for the compression so there were bulges in the final compressed bag so adding to the size – and I needed a smaller size.

Lifeventure Compression Sack

I chose a 15l sack, when a 10l sack may have been large enough, as I was thinking ahead to the multi-day trips I have planned for the future, when I will have to pack extra clothing. On testing it still made a smaller packed size with the sleeping bag and overnight spare clothes than the original sleeping bag compression sack.

15l Lifeventure Compression Sack


Compression Sack Read More »

Stove Test

Jeremy and I have spent some time today experimenting with our Crusader Mug and stove using natural fuel.

20120405-140829.jpg

We have a pine tree in our garden and last week we gathered some of the fallen pine cones and dried them indoors. Today we broke one up and used it to boil about two mugs of water – to light it using the fire steel we had to add about a teaspoon of meths to the pine cone bits.

The metal lid for the Crusader Mug was essential, the plastic one that BCB sells would have been damaged by the high flames, it also kept ash that came off the fuel out of the water. (This lid was made for me by The Little Frog Group.)

For my latest lightweight cooking gear set up – click here.

Stove Test Read More »